IEC 62899-301-1:2017
(Main)Printed electronics - Part 301-1: Equipment - Contact printing - Rigid master - Measurement method of plate master external dimension
Printed electronics - Part 301-1: Equipment - Contact printing - Rigid master - Measurement method of plate master external dimension
IEC 62899-301-1:2017(E) defines measurement terms and methods related to the external dimension of a rigid plate master. Measurement terms include geometrical size such as edge length, edge squareness, edge straightness and thickness, flatness of plate master substrates, and surface roughness of plate master.
General Information
- Status
- Published
- Publication Date
- 09-May-2017
- Technical Committee
- TC 119 - Printed Electronics
- Drafting Committee
- WG 3 - TC 119/WG 3
- Current Stage
- PPUB - Publication issued
- Start Date
- 10-May-2017
- Completion Date
- 26-May-2017
Overview - IEC 62899-301-1:2017 (Printed electronics, Rigid plate master measurement)
IEC 62899-301-1:2017 is an international measurement standard for printed electronics contact-printing masters. It defines terms and repeatable measurement methods for the external dimensions of a rigid plate master used in contact printing processes. The standard covers geometrical size (edge length, squareness, straightness, thickness), flatness of plate substrates, and surface roughness of the plate master.
Key topics and technical requirements
- Geometry and terminology
- Defines reference edges, machine direction (MD), cross direction (CD) and orientation corner for consistent referencing of measurements.
- Geometrical size measurements
- Procedures for measuring edge length, edge squareness, edge straightness and thickness.
- Two procedural paths (Procedure A and Procedure B) are provided, with guidance on measuring instruments and reporting.
- Flatness measurement
- Methods for assessing substrate flatness, including measurement locations and environmental/control considerations.
- Illustrations and example reporting formats for flatness profiles.
- Surface roughness measurement
- Defines measurement approaches for surface roughness using mechanical and optical stylus instruments, calibration, measurement conditions and reporting.
- Instruments and calibration
- Recommends appropriate measuring equipment: coordinate measuring machines (CMM), mechanical stylus and optical stylus instruments.
- Specifies importance of instrument calibration and controlled measurement environment for reproducible results.
- Reporting
- Examples and templates for reporting measurement results (profiles, flatness and roughness summaries) to support quality control and supplier communication.
Practical applications and users
Who uses IEC 62899-301-1:2017:
- Printed electronics manufacturers producing flexible and rigid printed circuits where master precision affects final device performance.
- Printing master manufacturers and tooling suppliers validating plate master geometry and surface finish.
- Equipment vendors developing master-making and inspection systems (CMM, optical/metrological tools).
- Quality, metrology and process engineers who require standardized measurement methods for production control, supplier acceptance and traceability.
Why it matters:
- Ensures consistent measurement of plate master attributes that directly affect print registration, feature fidelity and yield in contact printing processes (gravure, offset, screen).
- Facilitates supplier-vendor communication and quality assurance across the printed electronics supply chain.
Related standards
- IEC 62899 series (printed electronics) - this part is one element of the broader printed electronics standard family. Consult the IEC catalogue for other parts in the series.
Get Certified
Connect with accredited certification bodies for this standard

IMP NDT d.o.o.
Non-destructive testing services. Radiography, ultrasonic, magnetic particle, penetrant, visual inspection.

Inštitut za kovinske materiale in tehnologije
Institute of Metals and Technology. Materials testing, metallurgical analysis, NDT.

Q Techna d.o.o.
NDT and quality assurance specialist. 30+ years experience. NDT personnel certification per ISO 9712, nuclear and thermal power plant inspections, QA/
Sponsored listings
Frequently Asked Questions
IEC 62899-301-1:2017 is a standard published by the International Electrotechnical Commission (IEC). Its full title is "Printed electronics - Part 301-1: Equipment - Contact printing - Rigid master - Measurement method of plate master external dimension". This standard covers: IEC 62899-301-1:2017(E) defines measurement terms and methods related to the external dimension of a rigid plate master. Measurement terms include geometrical size such as edge length, edge squareness, edge straightness and thickness, flatness of plate master substrates, and surface roughness of plate master.
IEC 62899-301-1:2017(E) defines measurement terms and methods related to the external dimension of a rigid plate master. Measurement terms include geometrical size such as edge length, edge squareness, edge straightness and thickness, flatness of plate master substrates, and surface roughness of plate master.
IEC 62899-301-1:2017 is classified under the following ICS (International Classification for Standards) categories: 01 - GENERALITIES. TERMINOLOGY. STANDARDIZATION. DOCUMENTATION; 19.080 - Electrical and electronic testing; 37.100.10 - Reproduction equipment. The ICS classification helps identify the subject area and facilitates finding related standards.
IEC 62899-301-1:2017 is available in PDF format for immediate download after purchase. The document can be added to your cart and obtained through the secure checkout process. Digital delivery ensures instant access to the complete standard document.
Standards Content (Sample)
IEC 62899-301-1 ®
Edition 1.0 2017-05
INTERNATIONAL
STANDARD
colour
inside
Printed electronics –
Part 301-1: Equipment – Contact printing – Rigid master – Measurement method
of plate master external dimension
All rights reserved. Unless otherwise specified, no part of this publication may be reproduced or utilized in any form
or by any means, electronic or mechanical, including photocopying and microfilm, without permission in writing from
either IEC or IEC's member National Committee in the country of the requester. If you have any questions about IEC
copyright or have an enquiry about obtaining additional rights to this publication, please contact the address below or
your local IEC member National Committee for further information.
IEC Central Office Tel.: +41 22 919 02 11
3, rue de Varembé Fax: +41 22 919 03 00
CH-1211 Geneva 20 info@iec.ch
Switzerland www.iec.ch
About the IEC
The International Electrotechnical Commission (IEC) is the leading global organization that prepares and publishes
International Standards for all electrical, electronic and related technologies.
About IEC publications
The technical content of IEC publications is kept under constant review by the IEC. Please make sure that you have the
latest edition, a corrigenda or an amendment might have been published.
IEC Catalogue - webstore.iec.ch/catalogue Electropedia - www.electropedia.org
The stand-alone application for consulting the entire The world's leading online dictionary of electronic and
bibliographical information on IEC International Standards, electrical terms containing 20 000 terms and definitions in
Technical Specifications, Technical Reports and other English and French, with equivalent terms in 16 additional
documents. Available for PC, Mac OS, Android Tablets and languages. Also known as the International Electrotechnical
iPad. Vocabulary (IEV) online.
IEC publications search - www.iec.ch/searchpub IEC Glossary - std.iec.ch/glossary
The advanced search enables to find IEC publications by a 65 000 electrotechnical terminology entries in English and
variety of criteria (reference number, text, technical French extracted from the Terms and Definitions clause of
committee,…). It also gives information on projects, replaced IEC publications issued since 2002. Some entries have been
and withdrawn publications. collected from earlier publications of IEC TC 37, 77, 86 and
CISPR.
IEC Just Published - webstore.iec.ch/justpublished
Stay up to date on all new IEC publications. Just Published IEC Customer Service Centre - webstore.iec.ch/csc
details all new publications released. Available online and If you wish to give us your feedback on this publication or
also once a month by email. need further assistance, please contact the Customer Service
Centre: csc@iec.ch.
IEC 62899-301-1 ®
Edition 1.0 2017-05
INTERNATIONAL
STANDARD
colour
inside
Printed electronics –
Part 301-1: Equipment – Contact printing – Rigid master – Measurement method
of plate master external dimension
INTERNATIONAL
ELECTROTECHNICAL
COMMISSION
ICS 19.080; 37.100.10 ISBN 978-2-8322-4302-2
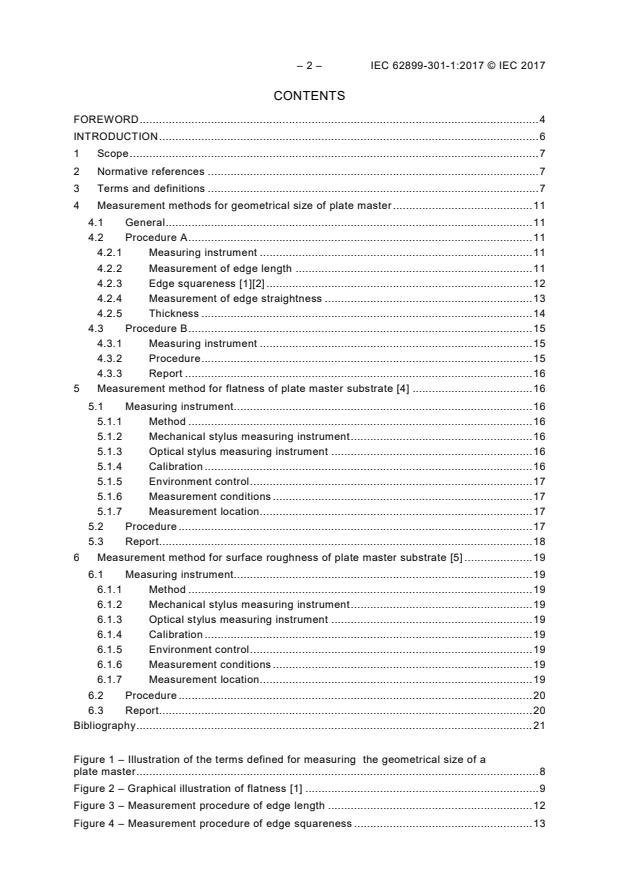
– 2 – IEC 62899-301-1:2017 © IEC 2017
CONTENTS
FOREWORD . 4
INTRODUCTION . 6
1 Scope . 7
2 Normative references . 7
3 Terms and definitions . 7
4 Measurement methods for geometrical size of plate master . 11
4.1 General . 11
4.2 Procedure A . 11
4.2.1 Measuring instrument . 11
4.2.2 Measurement of edge length . 11
4.2.3 Edge squareness [1][2] . 12
4.2.4 Measurement of edge straightness . 13
4.2.5 Thickness . 14
4.3 Procedure B . 15
4.3.1 Measuring instrument . 15
4.3.2 Procedure . 15
4.3.3 Report . 16
5 Measurement method for flatness of plate master substrate [4] . 16
5.1 Measuring instrument. 16
5.1.1 Method . 16
5.1.2 Mechanical stylus measuring instrument . 16
5.1.3 Optical stylus measuring instrument . 16
5.1.4 Calibration . 16
5.1.5 Environment control . 17
5.1.6 Measurement conditions . 17
5.1.7 Measurement location. 17
5.2 Procedure . 17
5.3 Report. 18
6 Measurement method for surface roughness of plate master substrate [5] . 19
6.1 Measuring instrument. 19
6.1.1 Method . 19
6.1.2 Mechanical stylus measuring instrument . 19
6.1.3 Optical stylus measuring instrument . 19
6.1.4 Calibration . 19
6.1.5 Environment control . 19
6.1.6 Measurement conditions . 19
6.1.7 Measurement location. 19
6.2 Procedure . 20
6.3 Report. 20
Bibliography . 21
Figure 1 – Illustration of the terms defined for measuring the geometrical size of a
plate master . 8
Figure 2 – Graphical illustration of flatness [1] . 9
Figure 3 – Measurement procedure of edge length . 12
Figure 4 – Measurement procedure of edge squareness . 13
Figure 5 – Measurement procedure of edge straightness . 14
Figure 6 – Measurement locations for geometrical size of plate using CMM . 16
Table 1 – Example of profile measurement results . 18
Table 2 – Example of flatness measurement results. 18
Table 3 – Example of surface roughness measurement results . 20
– 4 – IEC 62899-301-1:2017 © IEC 2017
INTERNATIONAL ELECTROTECHNICAL COMMISSION
____________
PRINTED ELECTRONICS –
Part 301-1: Equipment – Contact printing – Rigid master –
Measurement method of plate master external dimension
FOREWORD
1) The International Electrotechnical Commission (IEC) is a worldwide organization for standardization comprising
all national electrotechnical committees (IEC National Committees). The object of IEC is to promote
international co-operation on all questions concerning standardization in the electrical and electronic fields. To
this end and in addition to other activities, IEC publishes International Standards, Technical Specifications,
Technical Reports, Publicly Available Specifications (PAS) and Guides (hereafter referred to as “IEC
Publication(s)”). Their preparation is entrusted to technical committees; any IEC National Committee interested
in the subject dealt with may participate in this preparatory work. International, governmental and non-
governmental organizations liaising with the IEC also participate in this preparation. IEC collaborates closely
with the International Organization for Standardization (ISO) in accordance with conditions determined by
agreement between the two organizations.
2) The formal decisions or agreements of IEC on technical matters express, as nearly as possible, an international
consensus of opinion on the relevant subjects since each technical committee has representation from all
interested IEC National Committees.
3) IEC Publications have the form of recommendations for international use and are accepted by IEC National
Committees in that sense. While all reasonable efforts are made to ensure that the technical content of IEC
Publications is accurate, IEC cannot be held responsible for the way in which they are used or for any
misinterpretation by any end user.
4) In order to promote international uniformity, IEC National Committees undertake to apply IEC Publications
transparently to the maximum extent possible in their national and regional publications. Any divergence
between any IEC Publication and the corresponding national or regional publication shall be clearly indicated in
the latter.
5) IEC itself does not provide any attestation of conformity. Independent certification bodies provide conformity
assessment services and, in some areas, access to IEC marks of conformity. IEC is not responsible for any
services carried out by independent certification bodies.
6) All users should ensure that they have the latest edition of this publication.
7) No liability shall attach to IEC or its directors, employees, servants or agents including individual experts and
members of its technical committees and IEC National Committees for any personal injury, property damage or
other damage of any nature whatsoever, whether direct or indirect, or for costs (including legal fees) and
expenses arising out of the publication, use of, or reliance upon, this IEC Publication or any other IEC
Publications.
8) Attention is drawn to the Normative references cited in this publication. Use of the referenced publications is
indispensable for the correct application of this publication.
9) Attention is drawn to the possibility that some of the elements of this IEC Publication may be the subject of
patent rights. IEC shall not be held responsible for identifying any or all such patent rights.
International Standard IEC 62903-1 has been prepared by IEC technical committee:119:
Printed electronics.
The text of this standard is based on the following documents:
FDIS Report on voting
119/152/FDIS 119/162/RVD
Full information on the voting for the approval of this International Standard can be found in
the report on voting indicated in the above table.
This document has been drafted in accordance with the ISO/IEC Directives, Part 2.
A list of all parts in the IEC 62899 series, published under the general title Printed electronics,
can be found on the IEC website.
The committee has decided that the contents of this document will remain unchanged until the
stability date indicated on the IEC website under "http://webstore.iec.ch" in the data related to
the specific document. At this date, the document will be
• reconfirmed,
• withdrawn,
• replaced by a revised edition, or
• amended.
A bilingual version of this publication may be issued at a later date.
IMPORTANT – The 'colour inside' logo on the cover page of this publication indicates
that it contains colours which are considered to be useful for the correct
understanding of its contents. Users should therefore print this document using a
colour printer.
– 6 – IEC 62899-301-1:2017 © IEC 2017
INTRODUCTION
When dissecting the term “printed electronics”, it can be easily understood that this industry
involves electronic devices and products that are made using some kind of printing technique.
Printing methods have been widely used in textile and paper type substrates for centuries. In
the past, the advent of mass producible printouts has brought huge impacts on how
knowledge is stored, transferred and reproduced. At this current stage of technological
development, printing on either rigid or flexible substrates is considered to supplement or
replace traditional electronic device manufacturing processes. The difference between media
printing and printed electronics stems from the fact that media print is used to convey
information for humans to process using their eyes while printed electronics requires
machines to process electronic information; the level of required resolution and functionality
makes the difference. Some of the widely used functional materials for printed electronics are
though not limited to: nano- or micro-size metal particles, semiconductive polymers, and
dielectric materials. Due to the available and required readout resolution, small feature sizes
below 20 µm need to be printed. Layer thickness and registration accuracy of printed products
are closely related to the quality control of electronic devices and ink materials require a high
level of quality. Overall, printing tolerance is much smaller in printed electronics.
There are two main categories in the printing process for the printed electronics. One is a
non-contact printing process, such as inkjet printing and electrostatic discharge (ESD) printing
process. The other is a contact printing process such as gravure printing, gravure offset
printing, reverse offset printing and screen printing. This document provides a proposal for
measuring and assessing the printing master, therefore the scope is limited to the printing
process using the printing master.
The quality of the printing master is important because the ink is transferred from the printing
master to the substrate directly in these processes, which means that the quality of the results
of the printed circuit depends on the quality of the printing master. For a mass production of
the printed electronic devices, many companies such as device manufacturers, printing
master manufacturers and printing master manufacturing equipment vendors are related to
manufacturing and they would be using the printing master and the standardized
measurement and assessment methods.
PRINTED ELECTRONICS –
Part 301-1: Equipment – Contact printing – Rigid master –
Measurement method of plate master external dimension
1 Scope
This part of IEC 62899 defines measurement terms and methods related to the external
dimension of a rigid plate master.
Measurement terms include geometrical size such as edge length, edge squareness, edge
straightness and thickness, flatness of plate master substrates, and surface roughness of
plate master.
2 Normative references
There are no normative references in this document.
3 Terms and definitions
For the purposes of this document, the following terms and definitions apply.
ISO and IEC maintain terminological databases for use in standardization at the following
addresses:
• IEC Electropedia: available at http://www.electropedia.org/
• ISO Online browsing platform: available at http://www.iso.org/obp
3.1
plate master
device that carries the image to be printed
Note 1 to entry: The image on the plate may be raised above the surface (relief) or may be carved into the
surface.
3.2
geometrical definition of plate master
definition which is needed in order to determine the shape and size of the plate
3.3
orientation corner
asymmetric corner specified for the purpose of mechanical orientation and the operator’s
visual confirmation of plate orientation
Note 1 to entry: This term is introduced graphically in Figure 1.
– 8 – IEC 62899-301-1:2017 © IEC 2017
CD edge length (L )
CD
MD reference edge
Thickness measuring point
Orientation corner
(75 ± 5) %
of L CD reference edge
CD
Squareness
IEC
Figure 1 – Illustration of the terms defined for measuring
the geometrical size of a plate master
3.4
machine direction
MD
direction in which the stock flows
Note 1 to entry: It can also mean circumferential direction of a roll of substrate.
3.5
CD
cross direction
direction at right angles to the machine direction of a substrate
3.6
reference edges
two edges adjacent to the orientation corner which are used for referencing the position of the
plate master
Note 1 to entry: This term is introduced graphically in Figure 1.
3.7
MD reference edge
reference edge parallel with the MD
Note 1 to entry: This term is introduced graphically in Figure 1.
3.8
CD reference edge
reference edge parallel with the CD
Note 1 to entry: This term is introduced graphically in Figure 1.
3.9
edge length
length and width of edges in a rectangular plate master
Note 1 to entry: This term is introduced graphically in Figure 1.
Note 2 to entry: L and L are the edge length of the MD reference edge and CD reference edge, respectively.
MD CD
(50 ± 5) %
of L
MD
MD edge length (L )
MD
3.10
edge squareness
angular variation of MD reference edge relative to straight lines drawn between the ends of,
and perpendicular to, the CD reference edge of the plate master
Note 1 to entry: This term is introduced graphically in Figure 1.
3.11
edge straightness
S
t
deviation of an edge relative to a straight line
3.12
reference plane
user-defined flat plane approximating the front surface of a plate master and containing a
coordinate system
Note 1 to entry: The same definition is applied for the measurement of flatness and surface roughness.
3.13
thickness of the plate master
relative distance of the plate master from the bottom surface to the front surface at the center
position in the normal direction of the reference plane
Note 1 to entry: This term is introduced graphically in Figure 1.
3.14
flatness of plate master substrate
thickness variation of the entire plate master front surface relative to a reference plane when
the substrate back surface is constrained against an ideally flat surface
Note 1 to entry: This term is introduced graphically in Figure 2.
Flatness
Plate master
Back surface constrained
Ideally flat surface
IEC
Figure 2 – Graphical illustration of flatness [1]
3.14.1
flatness cut-off wavelength
wavelength at which the attenuation ratio of its amplitude becomes a standard value when the
traced profile is passed through the filter which eliminates the roughness element
3.14.2
profile
positive and negative vertical deviations measured from the reference plane
______________
Numbers in square brackets refer to the Bibliography.
– 10 – IEC 62899-301-1:2017 © IEC 2017
...


Questions, Comments and Discussion
Ask us and Technical Secretary will try to provide an answer. You can facilitate discussion about the standard in here.
Loading comments...